The Ryobi 40V battery system has revolutionized the way homeowners and professionals alike approach outdoor power equipment. Designed to deliver high performance and long-lasting power, these batteries are a popular choice for a wide range of tools, including lawn mowers, string trimmers, chainsaws, and blowers. As the demand for cordless and eco-friendly tools grows, so does the need to understand how these battery systems work, how to maintain them, and how to troubleshoot common issues. This article provides a comprehensive guide on the Ryobi 40V batterys system, including essential information about compatible chargers, battery models, warranty details, and troubleshooting tips.
Understanding the Ryobi 40V Battery System
The Ryobi 40V battery lineup is engineered for users who need more power and longer run time than traditional 18V systems can provide. This battery platform supports a wide array of outdoor power tools, allowing users to work cord-free while still getting professional-grade performance. One of the key advantages of this system is its compatibility—most 40V batteries can be used interchangeably across all Ryobi 40V tools.
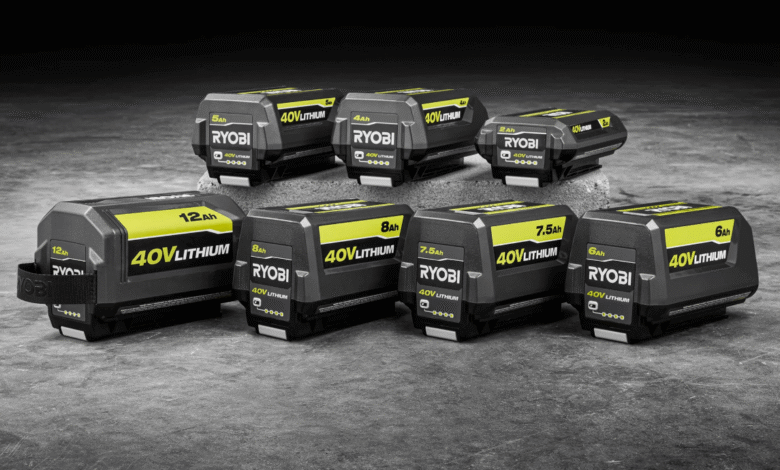
These lithium-ion batteries are designed to be robust and resilient, with capacities ranging from the compact 2.0Ah options to the ultra-high capacity Ryobi 40V batterys 12Ah models. The more amp-hours (Ah) a battery has, the longer it will power your tools before needing a recharge. For example, a Ryobi 40V battery 6Ah offers a great balance between weight and capacity, providing extended run time without adding too much bulk to the tool.
Charging Your Ryobi 40V Battery
To keep your tools powered, Ryobi offers several charging options. The Ryobi 40V battery charger is specifically designed to handle the unique voltage and charging requirements of the 40V system. These chargers are typically equipped with indicator lights that show the battery’s status—charging, fully charged, or defective.
If you’re purchasing a new tool or replacement batterys, it’s often best to get a Ryobi 40V batterys with charger package, ensuring compatibility and simplifying the charging process. Many Ryobi kits come with both battery and charger, labeled as a Ryobi 40V battery and charger bundle.
When using the charger, it’s crucial to keep it in a cool, dry place, as high temperatures can degrade battery performance. A full charge can take between 30 minutes to several hours, depending on the battery’s capacity.
Common Charging Issues: What to Do When Your Ryobi 40V Battery Is Not Charging
One of the most common problems users face is discovering that their Ryobi 40V battery is not charging. This can be due to several reasons, such as battery degradation, dirty or damaged terminals, or issues with the charger itself.
Start by inspecting the terminals on both the battery and the charger. Corrosion or debris can block the electrical connection, so cleaning them with a dry cloth or a cotton swab dipped in rubbing alcohol can sometimes fix the issue. If the terminals are clean and the battery still won’t charge, try testing another battery on the same charger or the same battery on a different charger to isolate the problem.
If neither approach works, it might be time to consider a Ryobi 40V batterys replacement or further troubleshooting steps like a reset.
How to Reset a Ryobi 40V Battery
Sometimes, a simple reset can bring a “dead” battery back to life. The Ryobi 40V battery reset process can often resolve issues where the battery appears dead but isn’t physically damaged. Here’s a basic method to reset Ryobi 40V batterys:
- Remove the battery from the charger and the tool.
- Place the battery into the charger and observe the lights.
- If lights 1 and 3 blink (we’ll cover these codes shortly), leave the battery in the charger for 30 to 60 minutes.
- Remove the battery and reinstall it in your tool to test.
Note that this is a general reset method and may not work for all issues. If your battery continues to fail, it could be a sign of internal cell damage that a reset won’t fix.
Decoding Ryobi 40V Battery Light Codes
The Ryobi 40V battery light codes are essential for diagnosing charging and operational issues. When the battery is placed on the charger, it uses a system of lights to communicate its status.
- Solid green light: Fully charged.
- Flashing green light: Charging in progress.
- Flashing red light: Battery is too hot or too cold.
- Red and green alternating: Battery fault or charger error.
A particularly confusing issue is when Ryobi 40V batterys lights 1 and 3 flash. This usually indicates a communication error between the battery and charger. In some cases, this can be resolved by cleaning the terminals or resetting the battery. If the issue persists, it’s recommended to test the battery with a different charger or contact Ryobi customer service.
Choosing the Right Battery Capacity: 6Ah vs 12Ah
Selecting the right battery depends on your specific needs. The Ryobi 40V battery 6Ah is ideal for medium-duty tasks like trimming and mowing small lawns. It offers a good balance between weight and runtime, making it a popular choice for everyday users.
On the other hand, the Ryobi 40V batterys 12Ah is designed for heavy-duty use. It significantly increases runtime, which is beneficial for large yards or professional landscaping work. However, it is heavier and more expensive. This model is particularly useful for tools with high power demands like chainsaws or large blowers.
If you’re someone who uses multiple Ryobi tools regularly, having a combination of 6Ah and 12Ah batteries can give you the flexibility to match the power output to the task at hand.
Battery Longevity and Warranty Information
The Ryobi 40V battery warranty typically covers three years from the date of purchase. This warranty protects against manufacturing defects and premature failure under normal usage conditions. It does not cover damage caused by improper use, neglect, or physical impact.
To extend the life of your battery:
- Store it in a cool, dry place.
- Avoid completely draining the battery before recharging.
- Do not leave it on the charger for extended periods after a full charge.
- Use only compatible Ryobi 40V batterys chargers.
If your battery begins to lose runtime significantly or shows signs of swelling or overheating, it’s best to contact Ryobi for support or consider purchasing a Ryobi 40V battery replacement.
Final Thoughts: Maximizing the Value of Your Ryobi 40V Battery System
The Ryobi 40V battery system provides an exceptional blend of power, portability, and environmental friendliness. With a wide variety of compatible tools and battery sizes, users can customize their setup to match their specific needs—whether it’s trimming hedges, mowing lawns, or cutting firewood.
Maintaining your battery properly and understanding how to troubleshoot common issues—such as when the Ryobi 40V battery is not charging, how to reset Ryobi 40V batterys, or interpreting Ryobi 40V batterys light codes—can go a long way in maximizing the lifespan and performance of your equipment. Investing in high-capacity models like the Ryobi 40V batterys 6Ah or 12Ah versions can ensure you’re always ready to tackle the toughest outdoor tasks.
And if problems do arise, Ryobi’s warranty and support services, as well as easily accessible Ryobi 40V batterys replacement options. Make it easier to keep your tools running at full strength. Whether you’re a DIY enthusiast or a professional landscaper. The Ryobi 40V batterys system offers the reliability and flexibility you need for any job.